Value Statement

Working with you and for you to make your memories last forever.

Like me on Facebook and follow me on Twitter

Showing posts with label Lightroom. Show all posts

Wednesday, 19 November 2014

Photoshop Tutorial

It is amazing how photographers will take a photo and shelve it based on small little errors when in reality you can use editing software to create something wonderful that makes your subject truly stand out. In this blog I will do my best to give you a blow by blow blog about a Photoshop edit from a recent photo I created.

This photo was taken at recent shoot I did for a city council hopeful and the venue was amazing. I want to first thank The Royal Hotel for allowing me to shoot in their lobby. I am really looking forward to going back there to capture more photos. I would also like to thank my subject Menu who is a super lady and a whole lot of fun. Now onto the edit.


This first photo is the original shot. I have said it before and will again a great edit starts from a great photo and I really like how this turned out. It has all the sharpness I need, the skin tones are nice and even and there is an interest that has been captured. That being said there are some negatives about it as well. I find the leaves dangling in front of the window very distracting, I don't like the sign poking out from her shoulder and lastly the phone cord drives me nuts. Finally there will be a little enhancing of Menu's already perfect smile and hair. Let's get into it.


Whenever I am editing a photo I always change what I dislike the most so for this photo I didn't like how contrasty it was. When this photo was shot I was using a flash with a 6x8 inch soft box which mounts to my speedlight. Even with the flash I still shot quite high ISO so the flash did not have to fill in so much light as to make the photo overly bright.

Step 1 the first thing I did was soften it a bit with a bit of noise reduction.

Step 2 was to bump up the exposure about 1 stop of light; it was just a bit dark but still had so much detail in the highlights and lowlights.

Step 3 was to replace the window I had a photo of this window in my catalogue of stock photos and I thought this would dramatize the photo just a bit more. Replacing the window is just a matter of cutting it from the original pasting into this photo and blending to make it look right.

Step 4 I used the clone tool to remove the phone cord

Step 5 grab the brush tool, sample the colour of her lips and "fix her lipstick" Now this step could have been done before the shot was taken but it was spur of the moment and neither of us thought about the fact her makeup was fading that late into the evening.

Step 6 is perhaps the most important. I used levels to brighten the photo and then with a layer mask I blocked out the section I didn't want brighter. What that equates to is just highlighting her hair and face.

That is pretty much it, now some purists will say that I changed the photo and they are not wrong. What they will fail to recognise is that I could have done the same things in a darkroom with film and hours upon hours of dodging and burning. Photos have always been manipulated to one degree or another and even the most amazing photographers in the world spend time cleaning up irritations in their photos. The difference between film and digital is time. What I can do now in my post editing software is instant, whereas what I did in film could take hours if not days.

Anyway here is the after post photo. As I said before, this photo had all the elements of a good photo to start with; I just perked it up a little. Hope you enjoy and please comment below and like my Facebook page to follow everything I do.


Sunday, 27 April 2014

Number One Reason Not to Throw Away

Sometimes when you take a photo and look at it there is no feeling, no emotion. The photo just falls flat and dull. Throw it away. That's it save some room on your hard drive and DELETE. OMG did I just say that. What I really meant was keep it, save it, cherish it, and look at it at a different time. Today I will show exactly what I mean. I took a photo that was that dull, delete photo but looking at it later I found a surprise in that photo. That never would happen if I just hit delete. Read on to learn more.

Very often when you are out shooting you pop off a couple hundred photos. You know that there will be some jewels in that mix and you will see them right away. Others are blurry and out of focus and just not usable. Then there are the questionable photos. These photos are what I refer to as Facebook quality, standard snap shot. Nothing special. What if they are, can you see them in a different light?


Take this photo I shot recently. The performer is an amazing "Crooner" Ron Boudreau. I approached him about a month ago to take some photos of his performance and he invited me back to his latest show at Chances Casino. After sifting through about 300 photos for the evening this one struck me as not bad, but not emotion evoking.


I scrolled through the photos a few times and this photo just kept calling me. I loved the expression on his face, the background has a quality of interest but too busy for the performer. It wanted something, so I sat for a long time and really looked at it. Since it was loaded into Lightroom I finally just started playing with some of the sliders and cropping.

First off let's minimize the back ground some and move the subject to the left third of the photo. Next we need to fix the exposure some and finally let's go black and white. Some photos just lend themselves to that one treatment. It's not something that should be used every time but that was exactly what this photo kept saying to me. It matched the performer, the location, and the lighting.


Here is the result and I don't think anyone would be disappointed in this.

And there it is folks. DO NOT throw away a photo that is on the border just sit quietly and let the photo tell you what it needs. Not every photo will but sometimes you will find that jewel in the rough

Saturday, 15 March 2014

Histo What

Have you seen or heard of the histogram on your camera? Do you know what it is and when or how to use it? Is this an easy thing to learn and remember? Read on in this week's edition to find out the what, when, and why of using this very valuable tool on your camera.

When you take a picture using the LCD screen on your camera you see a LCD depiction of what that photo looks like. How often though do you look at it and say to yourself that photo looks amazing only to go home load it onto your computer and say what a bunch of crap. This photo is way too dark or light. This is when knowing how to read a histogram becomes so important.

Let's start with how to show the histogram on your LCD screen. On a canon camera when you choose view photo you can then press the info button on the back left hand side of the camera body. Nikon users will have to look it up in your manual but it should be similar. As you click through you see a variety of views from shutter count to RGB and then there is histogram view.

Now that you can see your histogram let's talk about what it is and how to read it. The histogram shows the tonal range of a photo. That is the dark, the light, and the neutral. On the left hand side is the dark or black, on the right hand side is the light or white, and the middle ground is the neutrals and grays. When you take your photo what you want to see is a nice balance over all three sections right? Wrong. This is where most articles confuse you and I will try to keep it simple.


Look at what you are shooting before you press the shutter. Consider what tonal ranges are in your photo. If you are shooting on a very bright day and a lot of the subject is white you will see a stacking like a spike on the right side of your histogram. If your subject is a full third black or very dark then the histogram will stack to the left. It's only when everything is kind of equal across the range you see a nice balance across the histogram.


You can see in these three examples exactly what I'm talking about. The top photo the range is fairly balanced with a small spike in the middle and a large spike on the right. The spike on the right is the "blown out" sky. Blown out refers to the loss of digital information. The sensor is so overwhelmed there is no information to read on that far side.


This photo represents the tonal mid-range. There are a few spikes and those would be the sparkle off the dress and the clouds.


Finally A photo with the histogram pressed heavily to the left. With all this black there is no information to read.


As you can see from the examples reading a histogram is not really that difficult. Look at your shot watching for what you expect the histogram to read like, really bright, really black, or neutral and then expose for that using aperture, shutter speed or ISO


Monday, 17 February 2014

The Importance Of Backing Up

Help I was installing a new program on my computer and now I have a blue screen. What do I do? How many times have you heard this happen or maybe even had it happen to you. Read on in this week's blog to learn the importance of backing up your photos. Take some time to get it done before it's too late.

 Catastrophic failures happen every day in life. From hard drive failures on your computer to the tragedy of a house fire, and almost every time one of these unfortunate events takes place the words you hear most are "What about all my pictures." We are a very visual species and we cherish our memories that are usually immortalised in a photo or video and when we lose those we feel a great emptiness. Why is it then that we don't look after these things better?


Today's digital age is allowing options for looking after our photos that never existed to our forefathers. I use my laptop as a first copy of all my photos. I then back them up immediately onto my external hard drive that stays in my laptop bag, when not in use, so if something happens to my home then I can hopefully grab that one bag and exit my home. From there I burn my photos monthly to DVD and have two copies. One stays at my home and the other off site.

There are other options such as clouds, multiple hard drives, and others. What works for one may not work for another, a cloud for instance would not work for me due to the sheer volume of photos I would be trying to store. The important thing here is to remember have at minimum two copies of your cherished photos, you don't want to be a statistic of someone else who lost all their photographic memories.


The second part of backing up your photos is keeping them organised. One way is create a catalogue system according to shoot date. My system is to save all my photos on my laptop and external hard drive at the same time according to year_month_day_and description of the shot. You can see this below.


Another great tool is a catalogue similar to Adobe Lightroom. With this program you can attach "keywords" to the photo making it that much easier to find it in the future. There are a number of catalogue systems available on the market today so finding one that fits your budget and needs should not be a problem.

So there it is, several different ways to back up your cherished photographic memories. There is really no good excuse for not having them survive your most catastrophic failure, whatever that may be. Don't become a statistic and lose your great family memory.

Tuesday, 11 February 2014

Is RAW Right For You

You have your SLR Camera. You understand some of your manual settings. Now the question is what is RAW, why shoot in RAW why not just shoot in jpeg. RAW is a professional photo format right. Absolutely not. Read this week's blog to understand why shooting RAW will help you improve your photography and smooth out your editing problems.


Most SLR cameras and some higher end point and shoots allow you to shoot in jpeg format or RAW, and the biggest difference between the two formats is the amount of information that is stored. On my Canon I have the ability to shoot both at the same time which is the preference I use. The true beauty of shooting in RAW is you can control so much more of your post production work. Whenever you make adjustments to a photo in jpeg and save the file you lose just a little more information at a time, something to do with pixels being compressed. Let's face it there is nothing more frustrating than taking a photo and when you download it from the memory card you realize the white balance was a little off, or your exposure was over/under by a half stop, or any other little detail that might make the shot mediocre at best. After all you took your time, composed the shot, checked your white balance and your exposure, it should have been perfect but it's just off by a bit. In steps post production, you can see 7 Steps to Lightroom Magic for some tips. Post production is your friend and nothing makes it easier than working with a RAW file, the amount of detail that is captured and can be brought out of a photo is amazing.

This photo was taken at Harrison Lake, a place I love to wander around, and was all but lost due to the underexposure of the shot. It was a very bright back light that caused this couple, enjoying the rainy day, to become significantly underexpose. Now I realized this as soon as the shot was taken but before I could correct the problem they moved on. This is not a problem for me as I do shoot RAW and I knew that although the camera exposure sensor was tricked I could fix the photo in Lightroom and save this very candid moment. That's what the value of RAW is, saving a photo that needs just a bit of help.

There are other values to shooting RAW that I have not gotten into this week. Perhaps another time I will revisit this subject. If there is a question about the RAW vs. Jpeg please leave a comment or drop me a line.

Monday, 27 January 2014

Seven Steps To Lightroom Magic

With the recent release of Abobe Lightroom 5 for a mere $149.95 the amateur photographer now has the ability to enhance and improve a photo in the comfort of their own home. Lightroom is really the digital equivalent to a chemical darkroom back when we all shot with film. The enhancements that were done in the darkroom would improve exposure, clarity, contrast, pretty much everything you can now do in Lightroom. Let me take you through the steps I go through with most of the photos I create.


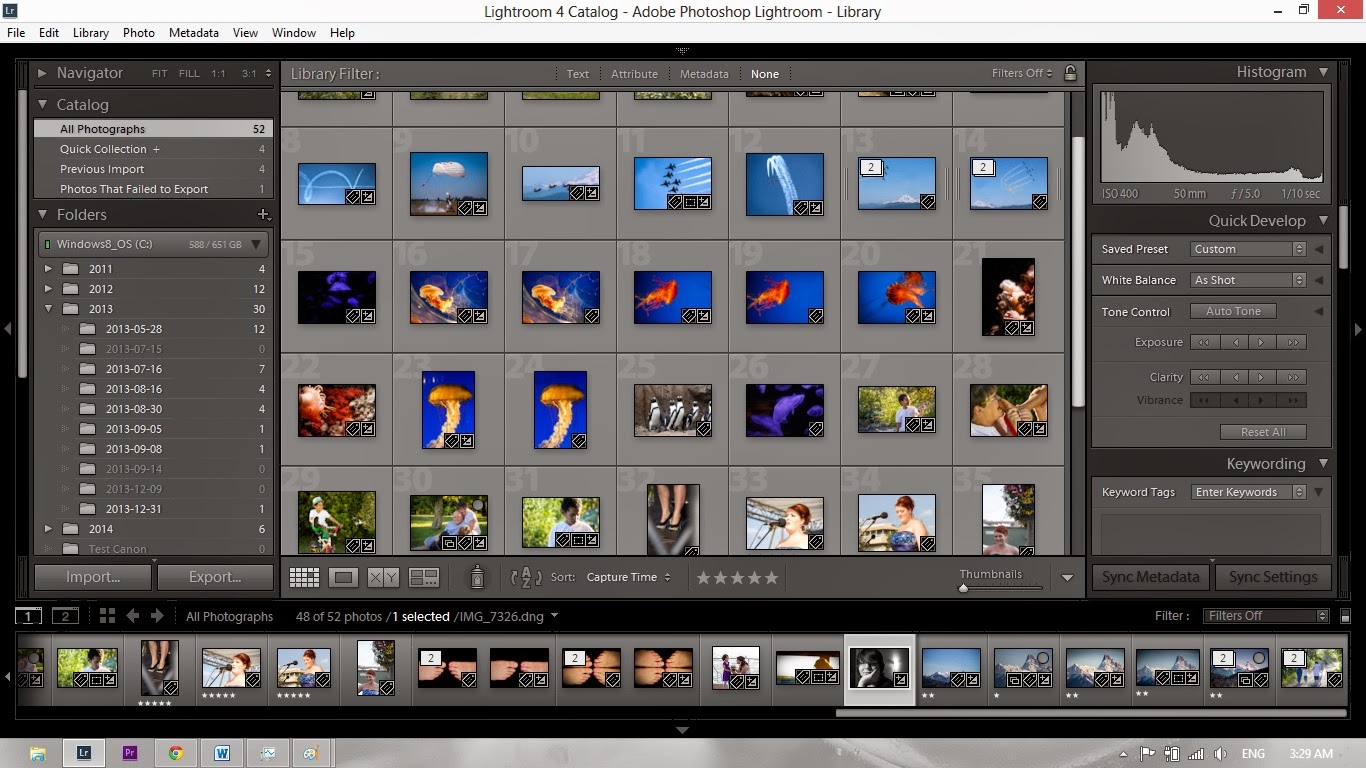
Here is a shot of my Lightroom catalogue. From this catalogue I can search for photos using a variety of methods from keyword searching, to star rating, and a host of other ways. Once I identify photos I would like to edit it's as simple as highlight them and click the develop tab.


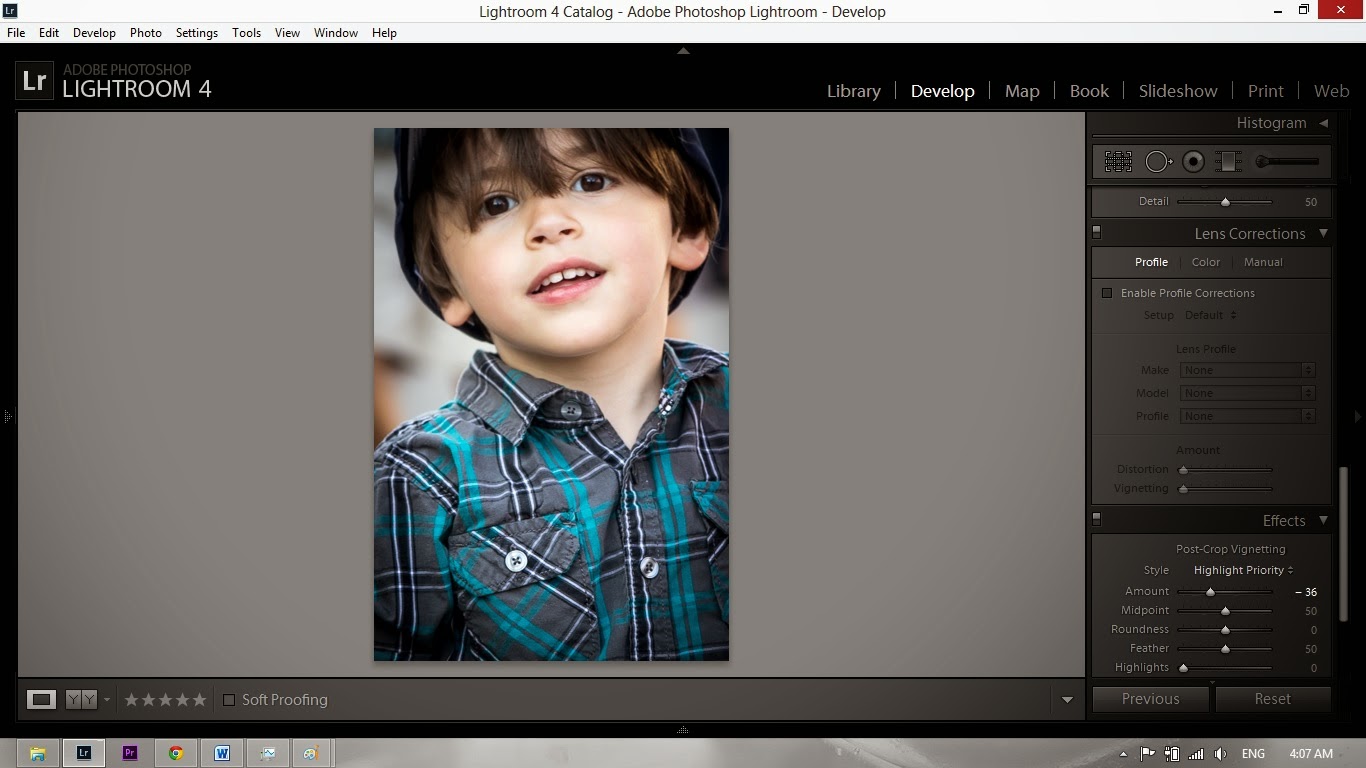
To the right is the first view you get when entering Lightrooms develop module. You will have a series of thumbnails across the bottom and the thumbnail you want to work on is highlighted and appears in the main viewing area. The photo you see here has not been altered from the original in camera shot.


Down the right side of the work palette you will see the basic menu where you will begin tweaking your photo from good to great. It is important to remember that the path to a great photo is starting with a great foundation and looking at the photo I am working on it has the right recipe. The composition I really like, the lighting and exposure is very good and now to make a few fine tuning adjustments.


I like to start with the highlights, shadows, whites, and blacks, in that order. I will make adjustments using the sliders and when I work the whites and blacks I use Alt while adjusting them. This makes the screen appear black and when I start to "Clip" (a phrase used when ever or under exposing)the blacks or whites it shows on the screen.


You see how the adjustment sliders have been altered and now the photo has a little more punch. I think it's on its way to a great portrait. Next a little clarity and variance.


Here is the portrait after clarity and hue have been adjusted. The third slider in this grouping is saturation. I tend to avoid using this slider as I feel that when the photo is printed the colour tends to become quite garish and unreal.


Now that we have made these adjustments we can sharpen and vignette the photo giving it a clear definition and a little artistic feel.


Before
After
And here it is the finished product. All the changes made to this photo were done in Lightroom and I have done these same adjustments in my darkroom, when I still shot film. People argue that by doing this enhancement you are not staying pure to the original picture, however there is no difference between what was done here in Lightroom and what I used to do in my darkroom. Your photos can be far better with just a few moments of time and a little tweaking here and there. It is no different than what photographers have been doing since the beginnings of time.