Value Statement

Working with you and for you to make your memories last forever.

Like me on Facebook and follow me on Twitter

Showing posts with label learning. Show all posts

Wednesday, 19 November 2014

Photoshop Tutorial

It is amazing how photographers will take a photo and shelve it based on small little errors when in reality you can use editing software to create something wonderful that makes your subject truly stand out. In this blog I will do my best to give you a blow by blow blog about a Photoshop edit from a recent photo I created.

This photo was taken at recent shoot I did for a city council hopeful and the venue was amazing. I want to first thank The Royal Hotel for allowing me to shoot in their lobby. I am really looking forward to going back there to capture more photos. I would also like to thank my subject Menu who is a super lady and a whole lot of fun. Now onto the edit.


This first photo is the original shot. I have said it before and will again a great edit starts from a great photo and I really like how this turned out. It has all the sharpness I need, the skin tones are nice and even and there is an interest that has been captured. That being said there are some negatives about it as well. I find the leaves dangling in front of the window very distracting, I don't like the sign poking out from her shoulder and lastly the phone cord drives me nuts. Finally there will be a little enhancing of Menu's already perfect smile and hair. Let's get into it.


Whenever I am editing a photo I always change what I dislike the most so for this photo I didn't like how contrasty it was. When this photo was shot I was using a flash with a 6x8 inch soft box which mounts to my speedlight. Even with the flash I still shot quite high ISO so the flash did not have to fill in so much light as to make the photo overly bright.

Step 1 the first thing I did was soften it a bit with a bit of noise reduction.

Step 2 was to bump up the exposure about 1 stop of light; it was just a bit dark but still had so much detail in the highlights and lowlights.

Step 3 was to replace the window I had a photo of this window in my catalogue of stock photos and I thought this would dramatize the photo just a bit more. Replacing the window is just a matter of cutting it from the original pasting into this photo and blending to make it look right.

Step 4 I used the clone tool to remove the phone cord

Step 5 grab the brush tool, sample the colour of her lips and "fix her lipstick" Now this step could have been done before the shot was taken but it was spur of the moment and neither of us thought about the fact her makeup was fading that late into the evening.

Step 6 is perhaps the most important. I used levels to brighten the photo and then with a layer mask I blocked out the section I didn't want brighter. What that equates to is just highlighting her hair and face.

That is pretty much it, now some purists will say that I changed the photo and they are not wrong. What they will fail to recognise is that I could have done the same things in a darkroom with film and hours upon hours of dodging and burning. Photos have always been manipulated to one degree or another and even the most amazing photographers in the world spend time cleaning up irritations in their photos. The difference between film and digital is time. What I can do now in my post editing software is instant, whereas what I did in film could take hours if not days.

Anyway here is the after post photo. As I said before, this photo had all the elements of a good photo to start with; I just perked it up a little. Hope you enjoy and please comment below and like my Facebook page to follow everything I do.


Wednesday, 21 May 2014

A new restoration

Hey everybody. Sorry I have been off again as of late. Things have been super hectic, but I wanted to just stop by and post a couple of words and showcase some of my latest restoration work. Feel free to read on about some exciting upcoming things for ChrisTopher Films.

But first. Here are a series of photo restorations I have been contracted to fix. You need to have a passion for this kind of work cause you will never get rich doing it, but the rewards of seeing your clients eyes sparkle with a tear, are sometimes the best reward.


 Take for example this photo from last year that some of you may have seen in A Guide to Restoration also seen on this blog.


This photo had a value to the client that was so big and she had been told by several other restoration outlets it was impossible to restore. She wasn't looking for a high res digital photo; she just wanted to see her children when they were babies again.


Now this next photo was entirely different. Look very closely at the banner and you will see the photo was taken in 1901. This client entrusted to me, over anybody else, a photo that is 113 years old. Every time I moved it I had to ensure it remained rigid and flat as it was crumbling, soon to be lost forever. Now it can be printed over and over again.


Finally my latest which I have had for quite some time. I know nothing about the photo or the family who it will go to. It is a gift from one friend to another and I truly hope they like it.


Oh and the big news. Starting in September I will be hosting with support from Sardis Public Library and Fraser Valley Regional Library a new drop in camera club. My goal is to do in person what my attempts are to do on this blog, learn and educate from and for likeminded photographers in Chilliwack and the Fraser Valley

Sunday, 27 April 2014

Number One Reason Not to Throw Away

Sometimes when you take a photo and look at it there is no feeling, no emotion. The photo just falls flat and dull. Throw it away. That's it save some room on your hard drive and DELETE. OMG did I just say that. What I really meant was keep it, save it, cherish it, and look at it at a different time. Today I will show exactly what I mean. I took a photo that was that dull, delete photo but looking at it later I found a surprise in that photo. That never would happen if I just hit delete. Read on to learn more.

Very often when you are out shooting you pop off a couple hundred photos. You know that there will be some jewels in that mix and you will see them right away. Others are blurry and out of focus and just not usable. Then there are the questionable photos. These photos are what I refer to as Facebook quality, standard snap shot. Nothing special. What if they are, can you see them in a different light?


Take this photo I shot recently. The performer is an amazing "Crooner" Ron Boudreau. I approached him about a month ago to take some photos of his performance and he invited me back to his latest show at Chances Casino. After sifting through about 300 photos for the evening this one struck me as not bad, but not emotion evoking.


I scrolled through the photos a few times and this photo just kept calling me. I loved the expression on his face, the background has a quality of interest but too busy for the performer. It wanted something, so I sat for a long time and really looked at it. Since it was loaded into Lightroom I finally just started playing with some of the sliders and cropping.

First off let's minimize the back ground some and move the subject to the left third of the photo. Next we need to fix the exposure some and finally let's go black and white. Some photos just lend themselves to that one treatment. It's not something that should be used every time but that was exactly what this photo kept saying to me. It matched the performer, the location, and the lighting.


Here is the result and I don't think anyone would be disappointed in this.

And there it is folks. DO NOT throw away a photo that is on the border just sit quietly and let the photo tell you what it needs. Not every photo will but sometimes you will find that jewel in the rough

Tuesday, 8 April 2014

Focus Behind the Camera? Sure.

Ever hear of back button focus? No? What is it? Is it important? Why would I use it? Answers to these questions and more will be answered in this week's blog. Read on for 100 reasons why back button photography is the way to go and how to set it up.

When you are composing a photograph you as the photographer have the ability to choose where your camera will focus. If you are using a canon you will most likely have nine different points to choose from and three different focus types.

First let's address the focus types. The most common one to use is single shot. When using this mode you depress the shutter part way down your lens auto focus takes over and you press the shutter button all the way and presto a perfect photo:) The next option is AI focus. Much like single shot depress the shutter part way and the camera will auto focus on the point or points you have chosen. The nice thing with this mode is if you continue to depress the shutter part way and you subject moves you auto focus continues to track that subject and stay focused till you snap the shot. Last is AI Servo. In this mode your auto focus will track the subject constantly and even "learn" what it should be focusing on. Now this technology sounds amazing, and it is, until you start recomposing your shot and your camera tracks everything except the subject you want to shoot. Step in back button focus.

Through your camera menu settings you can disable the shutter button for focus and use one of the buttons on the back to focus with. Now you may ask yourself "why would I do that shutter focus is obviously the best way and that's why the camera company uses this default" right? Wrong. Camera companies use this feature because using a shutter button is normal practice and has been since cameras were invented, but remember the camera of our fathers and grandmothers did not have auto focus. Focus was gotten by turning a dial on the lens to bring the elements into alignment thereby achieving a crisp clean focus. Now with the flip of a switch and a press of a button a little red light appears in your view finder telling you the focus is perfect on your subject. So enough history, why use back button focus?

Look through your viewfinder at your subject, press your shutter part way down, look at the little red light in your viewfinder flash as your auto focus locks on to your subject, recompose, shoot. Now shot two. Look through your viewfinder at your subject, press your shutter part way down, look at the little red light. Get my point? This is very time consuming. Now change your camera to back button focus. Look through the viewfinder, press your back button, recompose and shoot. As long as your subject stays the same distance away from your lens you can recompose and shoot to your heart's content. This is the true beauty your shutter no longer has any use except what it should be for, activating the shutter, not focusing. If you choose to use your AI Servo mode you will find that again because it is independent of your shutter tracking your subject will be smoother and pressing your shutter button will be more fluid and controlled.

Anyway sorry for the lack of recent blogs. I hope you go out and try this new style of using your camera and as always I look forward to hearing your comments and getting your emails. Till next time.

Saturday, 15 March 2014

Histo What

Have you seen or heard of the histogram on your camera? Do you know what it is and when or how to use it? Is this an easy thing to learn and remember? Read on in this week's edition to find out the what, when, and why of using this very valuable tool on your camera.

When you take a picture using the LCD screen on your camera you see a LCD depiction of what that photo looks like. How often though do you look at it and say to yourself that photo looks amazing only to go home load it onto your computer and say what a bunch of crap. This photo is way too dark or light. This is when knowing how to read a histogram becomes so important.

Let's start with how to show the histogram on your LCD screen. On a canon camera when you choose view photo you can then press the info button on the back left hand side of the camera body. Nikon users will have to look it up in your manual but it should be similar. As you click through you see a variety of views from shutter count to RGB and then there is histogram view.

Now that you can see your histogram let's talk about what it is and how to read it. The histogram shows the tonal range of a photo. That is the dark, the light, and the neutral. On the left hand side is the dark or black, on the right hand side is the light or white, and the middle ground is the neutrals and grays. When you take your photo what you want to see is a nice balance over all three sections right? Wrong. This is where most articles confuse you and I will try to keep it simple.


Look at what you are shooting before you press the shutter. Consider what tonal ranges are in your photo. If you are shooting on a very bright day and a lot of the subject is white you will see a stacking like a spike on the right side of your histogram. If your subject is a full third black or very dark then the histogram will stack to the left. It's only when everything is kind of equal across the range you see a nice balance across the histogram.


You can see in these three examples exactly what I'm talking about. The top photo the range is fairly balanced with a small spike in the middle and a large spike on the right. The spike on the right is the "blown out" sky. Blown out refers to the loss of digital information. The sensor is so overwhelmed there is no information to read on that far side.


This photo represents the tonal mid-range. There are a few spikes and those would be the sparkle off the dress and the clouds.


Finally A photo with the histogram pressed heavily to the left. With all this black there is no information to read.


As you can see from the examples reading a histogram is not really that difficult. Look at your shot watching for what you expect the histogram to read like, really bright, really black, or neutral and then expose for that using aperture, shutter speed or ISO


Tuesday, 4 February 2014

5 Posing Tips For Unforgetable Portaits

How many have a camera pointed at them and suddenly you feel as awkward as you were in junior high looking to ask or be asked to your first dance. Then when you see the photos you see all the negative features you hate about yourself. Read this week's blog for
5 critical tips to posing for unforgettable portraits. I will let you in on secrets that will make you look 10 years younger and 15 pounds lighter, all without Photoshop.


1) Look at what's in your closet. Colour is key; you want what you wear to compliment your background. This means looking at a colour wheel, colours that lie close to each other are considered to be balanced and peaceful. Colours that are opposite are complementary, but not always in a pleasing fashion. Blue and yellow, almost opposite create very striking images, whereas green and red can clash very heavily. Keep this in mind when selecting clothing and makeup, or outfits when taking group portraits. You will want outfits to be balanced for a better photo.


2) Hair is next, what style is best for you. Wear what is comfortable for you and don't try a new style just before your session. If you don't like your neck line change it by using your hair. This is a brilliant technique. Never use your hair to "Frame" your face, it should be over one shoulder only and usually turning your head a little to the right, showing the left side of your face gives slimmer and shorter lines.


3) How much makeup is too much? This is mostly determined by the portrait style you are wanting. Glamorous photos in evening gowns and jewels should be complimented with darker and somewhat heavier makeup. If the upcoming shoot is just a casual jeans and blouse then wearing your standard amounts with a slight enhancement of the eyes and cheeks would look superb. Again if you have challenged areas then highlight or accent the areas you like to diminish the attributes you are not crazy about. When working in the Glam realm heavy accents of eyes or lips are good but never both.


Singing Artist KAT


4) Now the question "What do I do with my arms." Nothing looks more awkward then a person standing arms hanging at their side lifeless and sometimes even stiff. If you look at yourself in the mirror standing and admiring that new dress or shoes look at your arms. They are always slightly bent or maybe even crossed. These arm stances evoke emotion and your arms give out as much expression as your eyes.


5) Finally the single most important tip I can give. Usually people try to pull away from the camera they are trying to get away from it but when you do it creates double chin, tight expressions and a very poor photo. Photographers, professional or amateur, are telling you chin up and this isn't terrible advice but this pose does not look natural and you the subject tends to look stiff. The better way is to thrust your chin out. Now I don't mean force it out to the point where you look as stiff as your chin up, just a gentle little push forward, doing this reduces double chins and smooth's lines over your whole face giving you that slim jaw and neck.

Try using some or all of these tips and you will find your portraits look more natural and unforgettable.

Monday, 27 January 2014

Seven Steps To Lightroom Magic

With the recent release of Abobe Lightroom 5 for a mere $149.95 the amateur photographer now has the ability to enhance and improve a photo in the comfort of their own home. Lightroom is really the digital equivalent to a chemical darkroom back when we all shot with film. The enhancements that were done in the darkroom would improve exposure, clarity, contrast, pretty much everything you can now do in Lightroom. Let me take you through the steps I go through with most of the photos I create.


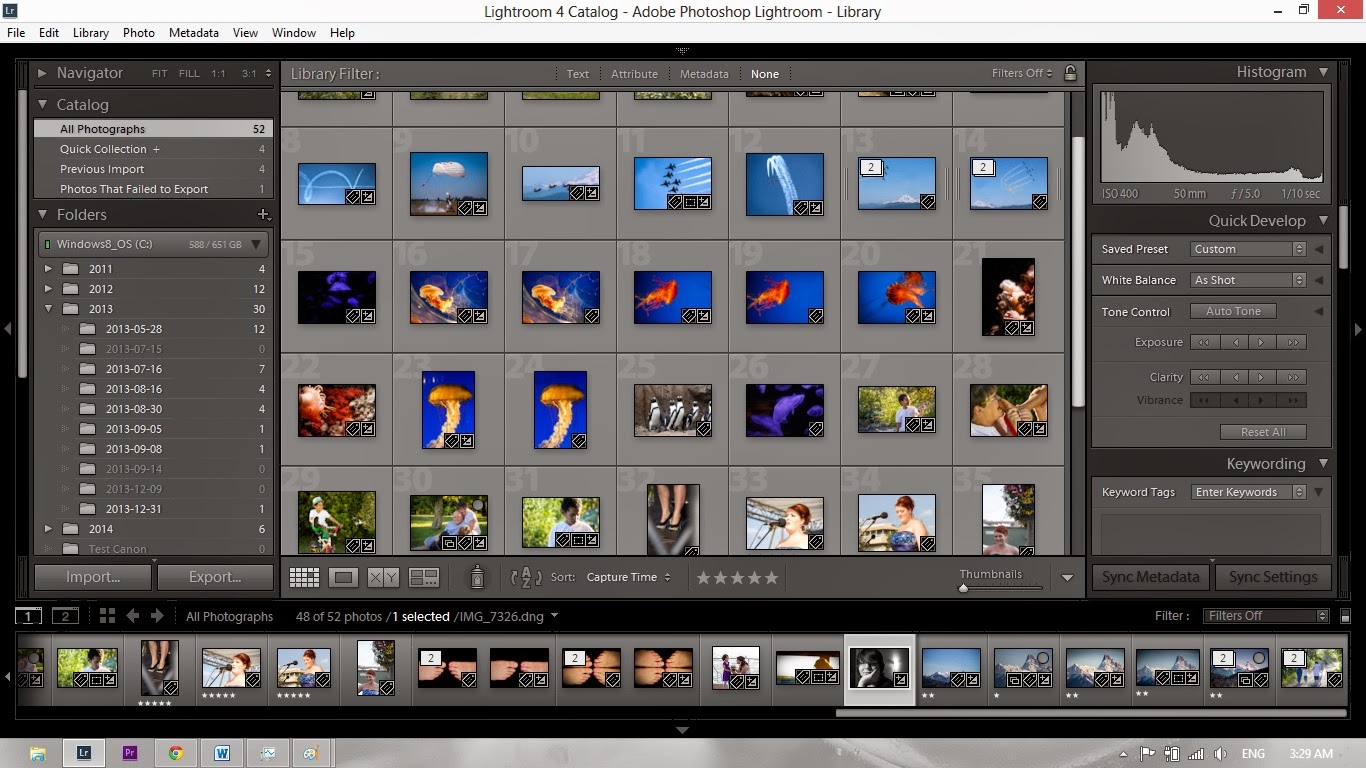
Here is a shot of my Lightroom catalogue. From this catalogue I can search for photos using a variety of methods from keyword searching, to star rating, and a host of other ways. Once I identify photos I would like to edit it's as simple as highlight them and click the develop tab.


To the right is the first view you get when entering Lightrooms develop module. You will have a series of thumbnails across the bottom and the thumbnail you want to work on is highlighted and appears in the main viewing area. The photo you see here has not been altered from the original in camera shot.


Down the right side of the work palette you will see the basic menu where you will begin tweaking your photo from good to great. It is important to remember that the path to a great photo is starting with a great foundation and looking at the photo I am working on it has the right recipe. The composition I really like, the lighting and exposure is very good and now to make a few fine tuning adjustments.


I like to start with the highlights, shadows, whites, and blacks, in that order. I will make adjustments using the sliders and when I work the whites and blacks I use Alt while adjusting them. This makes the screen appear black and when I start to "Clip" (a phrase used when ever or under exposing)the blacks or whites it shows on the screen.


You see how the adjustment sliders have been altered and now the photo has a little more punch. I think it's on its way to a great portrait. Next a little clarity and variance.


Here is the portrait after clarity and hue have been adjusted. The third slider in this grouping is saturation. I tend to avoid using this slider as I feel that when the photo is printed the colour tends to become quite garish and unreal.


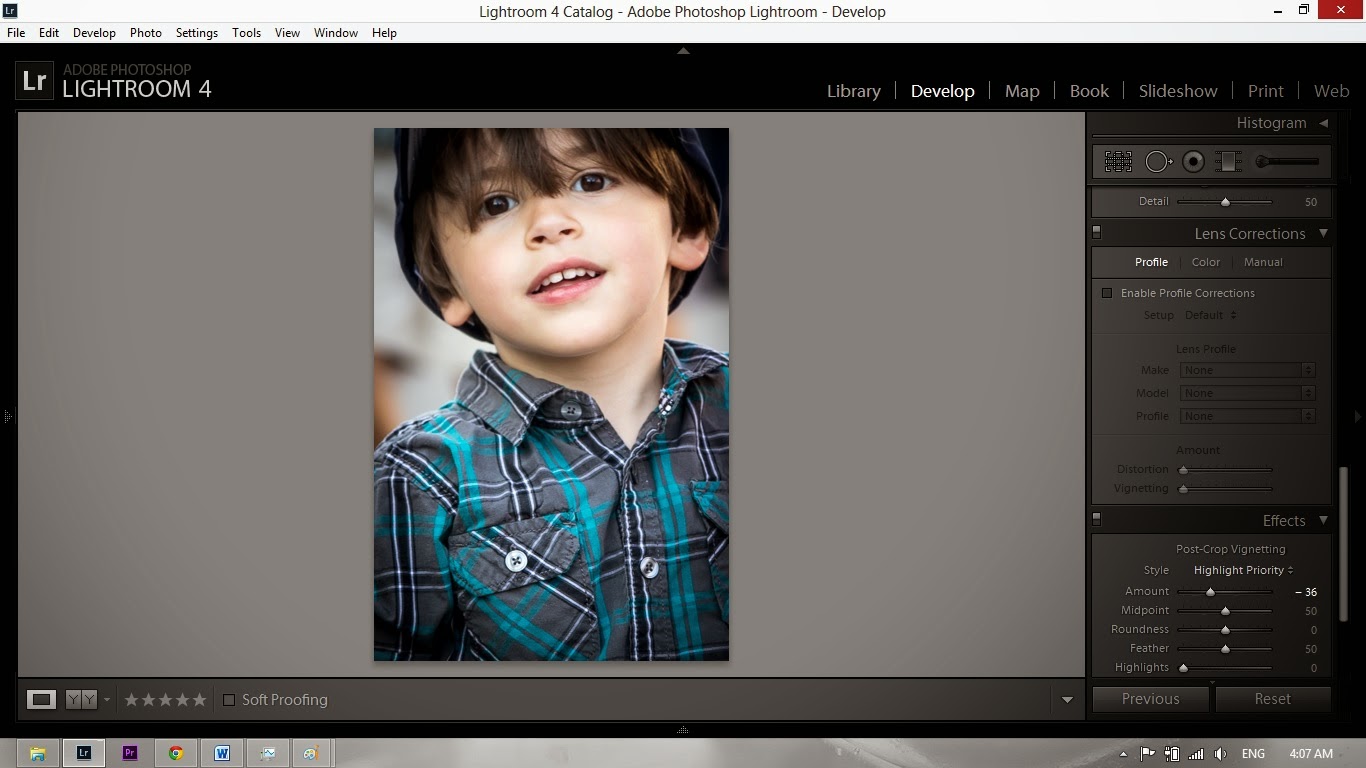
Now that we have made these adjustments we can sharpen and vignette the photo giving it a clear definition and a little artistic feel.


Before
After
And here it is the finished product. All the changes made to this photo were done in Lightroom and I have done these same adjustments in my darkroom, when I still shot film. People argue that by doing this enhancement you are not staying pure to the original picture, however there is no difference between what was done here in Lightroom and what I used to do in my darkroom. Your photos can be far better with just a few moments of time and a little tweaking here and there. It is no different than what photographers have been doing since the beginnings of time.


Friday, 27 September 2013

Learning to Shoot in Manual: Photography tutorials (Part Two) Exposure triangle


Here it is. The secret to shooting in full manual mode. Three little words, ISO, Aperture,Shutter. When you understand these 3 elements you will achieve optimal exposure.


So let's break it down. Shutter, most of you probably know, is how fast or slow the opening inside the camera opens and closes.When you press the button, known as the shutter button it causes the sensor inside your camera to be exposed to light. If you use very high shutter speeds then it will freeze action whereas if you use slower shutter speeds it creates more blur or softer images. Now why in the world do you want blurry images you ask, or you might say "that's why I'm looking at your blog because most of my pictures are blurry", there is a difference between out of focus and blur. If you look at a photo and everything is blurred then chances are it is either out of focus or you were shaking the camera. When things are creatively blurred then  most of the photo will be sharp, but a section will have blur to suggest movement or speed or softness.


Looking at this photo on the left you see how crisp all the details are except the bus. This is a great example of creative blur. It gives the feeling of motion and speed and the subject is clearly defined with composition (rule of thirds, more on that later) and the crispness of everything else in the frame.


Other examples of longer shutter speeds would be water that looks like mist, or light trails as shown on the right.


Now you cannot just alter the shutter speed alone. If you increase the length of shutter speed like I did, to capture these effects, your photo will come out like a white piece of paper, perhaps with some grey shadows here and there. The reason for this is because there was light coming into the camera for too long and your sensor was filled with light particles. A very good analogy is to imagine the sensor on your camera is a platform covered in buckets, you want your buckets to be filled just to the top. Overfill, and your buckets will leak water everywhere and wash out your photo. Don't fill the buckets enough and your photo won't have enough light and things will be dark to black. So how do you get the buckets filled when changing your shutter speeds so the buckets are filled to jut the right level. That's the other parts of the triangle.

Adjusting aperture gives you the ability to lengthen or shorten shutter speed based on need. Your aperture controls the size of the opening through your lens and therefore the amount of light that is allowed in. Now what is somewhat confusing is that the lower the aperture value, f1.2, f1.8, f2.0 the larger the opening in the glass. Lenses with a lower number f stop such as these are referred to as fast glass, because you can shoot at much faster shutter speeds in lower lighting conditions. If you increase the aperture number to f12, f18, or in the case of the photo above left f22 and on the right f9, you can then slow the shutter speed down considerably because the opening is so small the shutter needs to be opened longer to fill the buckets on our sensor.

Is that the only purpose of aperture, to control the speed of your shutter, of course not. If it was then photography would be much easier and everybody would take breathtaking photos every time. The other purpose to decreasing or increasing your aperture is to create back and foreground softness. If you look at the photo below you can see that just the main subject is in focus and everything behind begins to become softer and out of focus. 


This is one of those creative styles used in photography and especially portrait photos. If you  shoot landscapes or broader subjects where you want everything in focus then using a higher f stop will provide greater focus. These shallow and great focuses are what are referred to as depth of field. A shallow DOF is simply very little area in focus along one distance from the camera. Take for example the the photo above, the focus point on the subject is x feet away and everything in the photo that is that x distance away is in focus and everything else is not. Now look at the photo below, everything in this photo appears to be in focus and will so even if enlarged and that my friends is the simple truth of shallow vs. broad depth of field.


Now to be fair there are other ways to change depth of field using different lenses, prime vs. telephoto, but lets leave that subject for another day. For now I want you to go out and play with your depth of field and shutter speeds. You will discover that one is reflective of the other and both need to be in harmony to achieve a good exposure.

Oh wait what about the third part of the triangle, ISO. Well I think I will leave that to the next post as you have more than enough to chew on for now. ISO while important is not quite as difficult to understand as these other two and once you grasp shutter and aperture ISO will fall quietly into place. So till next time keep playing keep creating and have fun


Sunday, 22 September 2013

Learning to Shoot in Manual: Photography tutorials (Part One)

When I began shooting, as a small child, I was fortunate enough to have a great teacher to show me the ropes on a SLR camera. My Grandmother was a shutterbug in her day and had a very nice Olympus which she carried around to all the family reunions and trips she took. When she got on in years and was no longer able to get out with the frequency she wanted she allowed me to continue using that camera which I did right up to just over a year ago. When I made the switch to digital I transferred the camera strap from her camera to my new DSLR and now every shot I take I feel like a part of her is instilled in the picture.

Anyway I reminisce, The point I was going to make was although even then point and shoot cameras existed, Polaroid, Kodak, and a variety of others, I always shot on a SLR. The difference though is that those SLRs did not have an auto function at all, also the price for failure was somewhat expensive. After my Grandmother passed on and before I purchased my DSLR I equipped and used my own darkroom which helped cut some of the costs, but still it was quite pricey to make a mistake. That my friends is the beauty of the digital age. You can make mistakes and it costs you no more than time.

So I guess my question to you is why are you still using your camera in auto mode. You don't have to, going full manual is fun, exciting, and will feed a side of you just begging to be born. Now I'm not saying to turn off auto and never go back, if you are shooting something very important and you don't fully understand manual, stay in auto then when you have time to explore and practise go back to manual.

In this blog series I will endeavour to take you on a journey of exploration and excitement. We will together have moments of joy, at getting that perfect shot. Moments of frustration, trying to get that perfect shot. Finally moments of anguish when we entirely miss that perfect shot, but in the end we will grow and learn from each other.

So grab you camera lets go and make some mistakes. I promise the experience will be rewarding and you will feel that same sense of accomplishment all photographers get when they get that perfect shot.

The first step is of course getting your camera into manual. Now you don't necessarily have to have an SLR it's just that I do, many cameras today have manual or semi manual modes, it's just a question of finding it on yours. You can check your cameras manual, if you still have it, or look at the top of your camera. All DSLR have a button on them with different "modes" M being manual.


You can see all the different modes in the picture to the side. We will look at these modes in depth as we go but for now I just want you to locate manual mode. Remember that this is the first step to opening yourself up to a whole new side of creative photography so make the switch and without doing any thing else take some pictures.Leave your camera lens in auto focus and just shoot. What do you see? The odds are nothing, very few of you might see some sort of picture but most will either see nothing but black or white but certainly not what they shot. You see there are a few settings you must adjust to get the picture you want.


You see what your camera used to do on it's own in auto was adjust 3 variables that you as a photographer needs to become intimate with. They are ISO, Aperture, and Shutter speed. This is known as the photographic triangle. each of these plays off the other and none can be ignored or the photo just won't turn out.

For now just keep in mind that each of these three elements go hand in hand, I will explain them each in depth, but for now put your camera back in auto and look at the settings when you take a picture. From there, looking at your cameras manual, figure out how to adjust each of these settings. Don't hesitate to play around in manual mode change your aperture, change your shutter speed just watch the exposure indicator to ensure that a proper exposure is being met. If you don't know where the exposure indicator is then please open up the owners manual and read through it, things will be clearer as we progress through this series.