Value Statement

Working with you and for you to make your memories last forever.

Like me on Facebook and follow me on Twitter

Monday, 24 February 2014

Destination Kelowna

There is nothing like getting away and exploring a new environment. I had the opportunity recently to take my family away to Kelowna BC for BC's Family Day weekend. Read on to hear about some of the experiences we had, from places to stay and things to do.

Starting with our accommodations. We booked with Vacation By Owner which as of the third attempt was a great success. We stayed at Playa Del Sol in Kelowna's Mission District. Now I will say dealing with VRBO was somewhat trying and we did start our adventure off by thinking we had made a mistake. When I booked the first condo I received confirmation back very quickly and 2 days after providing the information required for a contract was informed that this unit had been double booked and was not actually available. The second attempt showed the unit as available but found out quickly it was not available either. I did consider giving up all together; however the other adventures we were looking forward to in Kelowna had already been booked as of the first confirmation.

Third time is the charm. We contacted the last person and new right away we were in the right place. The owner was professional, prompt and personable. The three P's are so important to me. We accepted the contract and were off to our Kelowna adventure.

The condo we rented was a lovely 2 bedrooms plus den, but the den had been converted to a third bedroom. The master had a king size bed and the other two rooms had queens. There was even a pull-out couch if you needed it.
Kitchen was well equipped with cookware enough to create some delightful dinners including eggs Benedict for breakfast, and my wife made tasty pineapple angel food cupcakes.


When in Kelowna in the winter no trip is complete without a trip to Big White Ski Village. We went up on the Saturday and were welcomed to fantastic interior BC powdery snow and crystal blue skies. One of my sons, an avid snowboarder, allowed me to capture this shot of his expertise. Now unfortunately I missed him face planting into the snow as he missed his landing, but exploiting what your kids give you is just part of the game.


We headed to The Bull Wheel for lunch. If you get up there the two absolute musts are the lobster chowder and the best wings I've ever eaten.


We ended the holiday in Kelowna with an exceptionally competitive round of mini golf or as my youngest calls it small golf.

So there it is. A holiday in a nut shell. Get out and enjoy your time with family, friends, or whoever. Life is always what you make it so make some memories today. Oh and try to photograph some of them too.

Monday, 17 February 2014

The Importance Of Backing Up

Help I was installing a new program on my computer and now I have a blue screen. What do I do? How many times have you heard this happen or maybe even had it happen to you. Read on in this week's blog to learn the importance of backing up your photos. Take some time to get it done before it's too late.

 Catastrophic failures happen every day in life. From hard drive failures on your computer to the tragedy of a house fire, and almost every time one of these unfortunate events takes place the words you hear most are "What about all my pictures." We are a very visual species and we cherish our memories that are usually immortalised in a photo or video and when we lose those we feel a great emptiness. Why is it then that we don't look after these things better?


Today's digital age is allowing options for looking after our photos that never existed to our forefathers. I use my laptop as a first copy of all my photos. I then back them up immediately onto my external hard drive that stays in my laptop bag, when not in use, so if something happens to my home then I can hopefully grab that one bag and exit my home. From there I burn my photos monthly to DVD and have two copies. One stays at my home and the other off site.

There are other options such as clouds, multiple hard drives, and others. What works for one may not work for another, a cloud for instance would not work for me due to the sheer volume of photos I would be trying to store. The important thing here is to remember have at minimum two copies of your cherished photos, you don't want to be a statistic of someone else who lost all their photographic memories.


The second part of backing up your photos is keeping them organised. One way is create a catalogue system according to shoot date. My system is to save all my photos on my laptop and external hard drive at the same time according to year_month_day_and description of the shot. You can see this below.


Another great tool is a catalogue similar to Adobe Lightroom. With this program you can attach "keywords" to the photo making it that much easier to find it in the future. There are a number of catalogue systems available on the market today so finding one that fits your budget and needs should not be a problem.

So there it is, several different ways to back up your cherished photographic memories. There is really no good excuse for not having them survive your most catastrophic failure, whatever that may be. Don't become a statistic and lose your great family memory.

Tuesday, 11 February 2014

Is RAW Right For You

You have your SLR Camera. You understand some of your manual settings. Now the question is what is RAW, why shoot in RAW why not just shoot in jpeg. RAW is a professional photo format right. Absolutely not. Read this week's blog to understand why shooting RAW will help you improve your photography and smooth out your editing problems.


Most SLR cameras and some higher end point and shoots allow you to shoot in jpeg format or RAW, and the biggest difference between the two formats is the amount of information that is stored. On my Canon I have the ability to shoot both at the same time which is the preference I use. The true beauty of shooting in RAW is you can control so much more of your post production work. Whenever you make adjustments to a photo in jpeg and save the file you lose just a little more information at a time, something to do with pixels being compressed. Let's face it there is nothing more frustrating than taking a photo and when you download it from the memory card you realize the white balance was a little off, or your exposure was over/under by a half stop, or any other little detail that might make the shot mediocre at best. After all you took your time, composed the shot, checked your white balance and your exposure, it should have been perfect but it's just off by a bit. In steps post production, you can see 7 Steps to Lightroom Magic for some tips. Post production is your friend and nothing makes it easier than working with a RAW file, the amount of detail that is captured and can be brought out of a photo is amazing.

This photo was taken at Harrison Lake, a place I love to wander around, and was all but lost due to the underexposure of the shot. It was a very bright back light that caused this couple, enjoying the rainy day, to become significantly underexpose. Now I realized this as soon as the shot was taken but before I could correct the problem they moved on. This is not a problem for me as I do shoot RAW and I knew that although the camera exposure sensor was tricked I could fix the photo in Lightroom and save this very candid moment. That's what the value of RAW is, saving a photo that needs just a bit of help.

There are other values to shooting RAW that I have not gotten into this week. Perhaps another time I will revisit this subject. If there is a question about the RAW vs. Jpeg please leave a comment or drop me a line.

Tuesday, 4 February 2014

5 Posing Tips For Unforgetable Portaits

How many have a camera pointed at them and suddenly you feel as awkward as you were in junior high looking to ask or be asked to your first dance. Then when you see the photos you see all the negative features you hate about yourself. Read this week's blog for
5 critical tips to posing for unforgettable portraits. I will let you in on secrets that will make you look 10 years younger and 15 pounds lighter, all without Photoshop.


1) Look at what's in your closet. Colour is key; you want what you wear to compliment your background. This means looking at a colour wheel, colours that lie close to each other are considered to be balanced and peaceful. Colours that are opposite are complementary, but not always in a pleasing fashion. Blue and yellow, almost opposite create very striking images, whereas green and red can clash very heavily. Keep this in mind when selecting clothing and makeup, or outfits when taking group portraits. You will want outfits to be balanced for a better photo.


2) Hair is next, what style is best for you. Wear what is comfortable for you and don't try a new style just before your session. If you don't like your neck line change it by using your hair. This is a brilliant technique. Never use your hair to "Frame" your face, it should be over one shoulder only and usually turning your head a little to the right, showing the left side of your face gives slimmer and shorter lines.


3) How much makeup is too much? This is mostly determined by the portrait style you are wanting. Glamorous photos in evening gowns and jewels should be complimented with darker and somewhat heavier makeup. If the upcoming shoot is just a casual jeans and blouse then wearing your standard amounts with a slight enhancement of the eyes and cheeks would look superb. Again if you have challenged areas then highlight or accent the areas you like to diminish the attributes you are not crazy about. When working in the Glam realm heavy accents of eyes or lips are good but never both.


Singing Artist KAT


4) Now the question "What do I do with my arms." Nothing looks more awkward then a person standing arms hanging at their side lifeless and sometimes even stiff. If you look at yourself in the mirror standing and admiring that new dress or shoes look at your arms. They are always slightly bent or maybe even crossed. These arm stances evoke emotion and your arms give out as much expression as your eyes.


5) Finally the single most important tip I can give. Usually people try to pull away from the camera they are trying to get away from it but when you do it creates double chin, tight expressions and a very poor photo. Photographers, professional or amateur, are telling you chin up and this isn't terrible advice but this pose does not look natural and you the subject tends to look stiff. The better way is to thrust your chin out. Now I don't mean force it out to the point where you look as stiff as your chin up, just a gentle little push forward, doing this reduces double chins and smooth's lines over your whole face giving you that slim jaw and neck.

Try using some or all of these tips and you will find your portraits look more natural and unforgettable.

Monday, 27 January 2014

Seven Steps To Lightroom Magic

With the recent release of Abobe Lightroom 5 for a mere $149.95 the amateur photographer now has the ability to enhance and improve a photo in the comfort of their own home. Lightroom is really the digital equivalent to a chemical darkroom back when we all shot with film. The enhancements that were done in the darkroom would improve exposure, clarity, contrast, pretty much everything you can now do in Lightroom. Let me take you through the steps I go through with most of the photos I create.


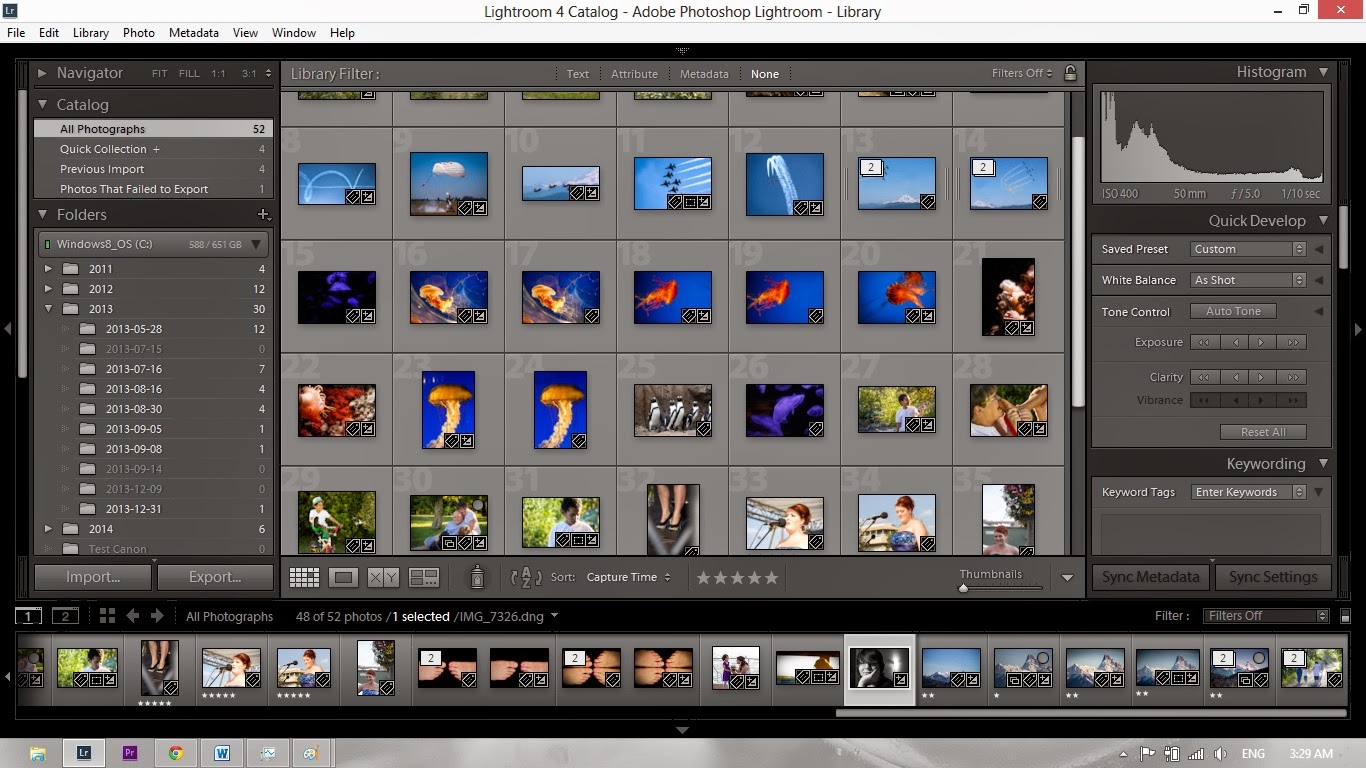
Here is a shot of my Lightroom catalogue. From this catalogue I can search for photos using a variety of methods from keyword searching, to star rating, and a host of other ways. Once I identify photos I would like to edit it's as simple as highlight them and click the develop tab.


To the right is the first view you get when entering Lightrooms develop module. You will have a series of thumbnails across the bottom and the thumbnail you want to work on is highlighted and appears in the main viewing area. The photo you see here has not been altered from the original in camera shot.


Down the right side of the work palette you will see the basic menu where you will begin tweaking your photo from good to great. It is important to remember that the path to a great photo is starting with a great foundation and looking at the photo I am working on it has the right recipe. The composition I really like, the lighting and exposure is very good and now to make a few fine tuning adjustments.


I like to start with the highlights, shadows, whites, and blacks, in that order. I will make adjustments using the sliders and when I work the whites and blacks I use Alt while adjusting them. This makes the screen appear black and when I start to "Clip" (a phrase used when ever or under exposing)the blacks or whites it shows on the screen.


You see how the adjustment sliders have been altered and now the photo has a little more punch. I think it's on its way to a great portrait. Next a little clarity and variance.


Here is the portrait after clarity and hue have been adjusted. The third slider in this grouping is saturation. I tend to avoid using this slider as I feel that when the photo is printed the colour tends to become quite garish and unreal.


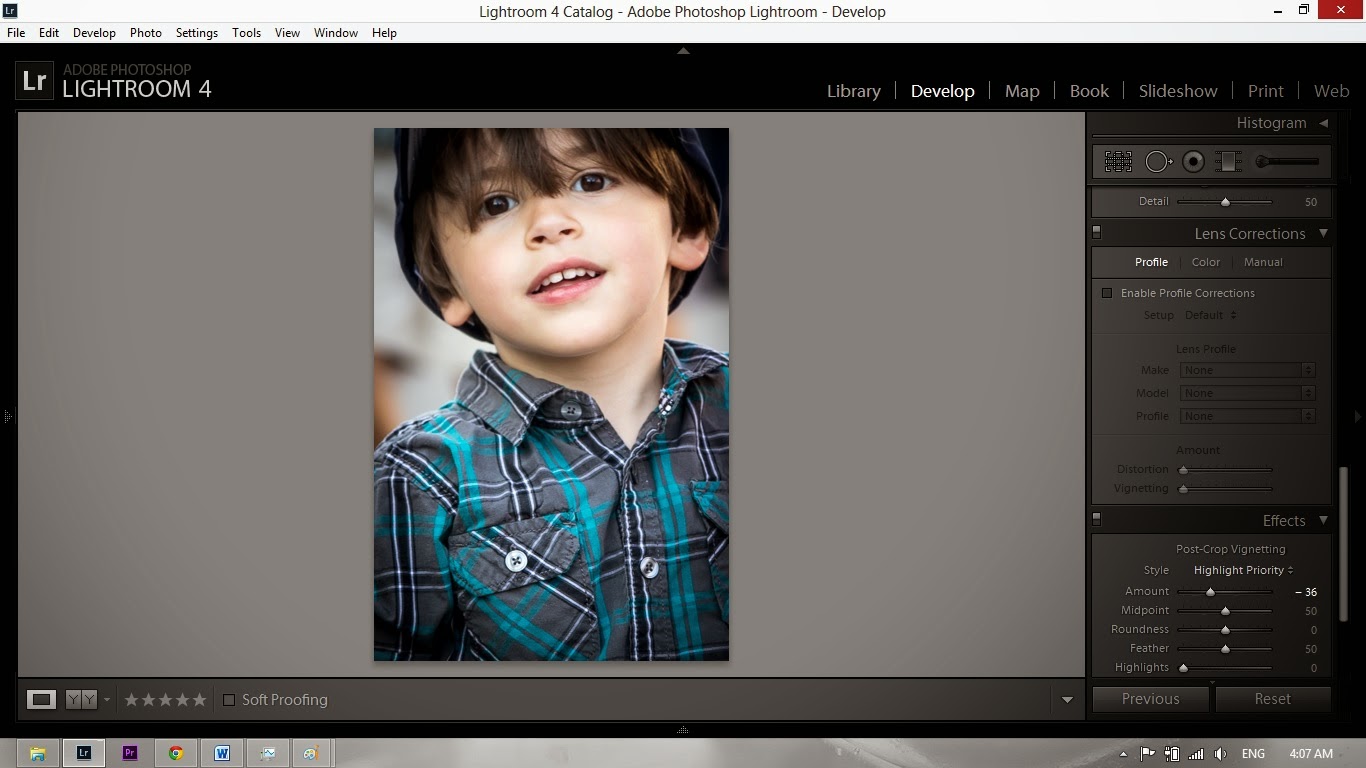
Now that we have made these adjustments we can sharpen and vignette the photo giving it a clear definition and a little artistic feel.


Before
After
And here it is the finished product. All the changes made to this photo were done in Lightroom and I have done these same adjustments in my darkroom, when I still shot film. People argue that by doing this enhancement you are not staying pure to the original picture, however there is no difference between what was done here in Lightroom and what I used to do in my darkroom. Your photos can be far better with just a few moments of time and a little tweaking here and there. It is no different than what photographers have been doing since the beginnings of time.


Monday, 20 January 2014

Lose Weight & Take Better Photos


What the heck are you talking about? Lose weight, Photography, not even related, or is it. Well when you have a desire to do something then you challenge yourself to stretch out and learn, overcome, or just plain move out of your comfort zone. That's what this week's blog is all about moving from your comfort zone.

Now I certainly will not profess to be an exercise guru. That's not who I am and in fact I am comfortably overweight by about 30 pounds (ish), but I can change that. I am, however a good photographer and I can change that as well. If I want to lose weight what do I need to do, control the amount I eat and exercise. If I want to become an excellent photographer, not just a good one what do I need to do, increase the amount I shoot and exercise my creative side. Now how does exercising and improving your photography skills go together, let me explain.


This photo, that appeared in last
week's blog about creativity, was taken from the side of the road not that far from my home. It is a photo of Mount Slesse, in the Fraser Valley, and represents a lazy photo. Although it was what was needed for me to get out of my slump it was not active. I did not have to work for it, it was there waiting for me. I could drive to the location I visualised set up my equipment and shoot away.


The photo of the alpine meadows represents the fit photographer. Also taken not far from my home, this is a meadow on Mount Cheam, which dominates the eastern Fraser Valley. If you want to visit this splendid area put on your hiking boots and check out this website http://www.trailpeak.com/trail-Mt-Cheam-near-Chilliwack-BC-538 you won't be disappointed.


To get to this meadow you will need a 4x4 and the whole day. You will drive about 90 minutes followed by a major hike before descending back down to Chilliwack. Due to the difficult nature of this location you will need to be very selective about what equipment you bring. Pack light (lose the weight) or it will be a very very long day.


That's all there is to it folks want to become a better photographer and get fit go out and explore. You could stay indoors use your flash do some interesting stuff, or you can go out, wander around and lose yourself in the wonders Mother Nature has provided for us to shoot. These are the memories to create and the pictures to make. I don't think there is anything better. Start becoming a great photographer today by exploring one shutter click at a time.

Sunday, 12 January 2014

Where The Heck Have I Been

Well it has been a long long time since I last blogged. I know you were starting to think, Oh Yeah another fly by night blogger, Here today and gone forever. For that I apologise. When I started I said you would be joining me on a journey. That journey has highs and lows, good and bad. So the last few months have been a low for my blogging inspiration, my photo inspiration, and really just in general blocked creatively and that SUCKS.

 Now I am back. Sit back relax and see where we go next.


Mount Slesse

Mount Slesse


These photos are what broke my slump.


Driving my child to school every morning I see the majestic Mount Slesse in the distance. It is nestled in its own frame of lower hills in front and the sky behind is breath taking this time of year. With this in mind I set out to capture the vision I have had of this picture for months.


You see this is the way of discovery.

 I visualised this photo over and over in my head. Other photographers talk or write of doing this but I seem to have been missing that element. Pre-visualization.  Then I heard an article on the radio that spoke about the need for long term self-visualization as being the journey to creativity.

While taking these photos I became more excited than I have for some time about shooting. Every frame, every click of the shutter and there on my LCD display was exactly what I had seen before I ever heard the click.

That was the journey, the reason I have been away for the past few months, and I have no regrets. Coming out on the other side has left me rejuvenated, excited, and more creative than I ever have been.

I look forward to sharing with you more of this journey as time goes by and remember if you are in your creative slump look at the pictures in your mind and leave your camera in the bag for a while. You won’t regret it, I know I haven’t.